Category: Articles

  • “Coded” Language

    “Coded” Language

    The use of acronyms and technical jargon in the world of software engineering is… out of control. API, IDE, entry-point, AGILE, SWE, Pandas, SGTM. These are just some of the terms thrown around at lunch with a software engineer. There is genuinely a second language used by computer scientists, but there is no Duolingo course available for “Annoying Nerd”.

    This manner of speaking obfuscates the point of what is being discussed behind layers of technicality that, for most casual discussions, is completely unnecessary. Not to mention the fact that this sort of “second language” is a major gatekeeping factor; if you cannot speak the language, you’re not going to be able to participate. And who is taught the language? Who is encouraged to become a computer programmer? I think if we examine the current biases in place in our society, we’ll see that this ocean of technical language further keeps out groups that aren’t encouraged to pursue this field in the first place. 

    Now obviously, when working in the role of Software Engineering, there are points where we must discuss the nitty gritty details of our implementations; that’s our job. My point here is not that all specialized language should be avoided or removed, but rather that we – as software engineers – have a communication issue. This issue has lasting consequences; it causes new computer scientists to feel more insecure, and that feeling can linger for years into their career. Nearly 60%[1] of computer scientists report experiencing imposter syndrome, with that number being far higher with computer scientists of minority demographics. 

    When I first joined computer science it seemed like there was so much information I couldn’t possibly conceive of, but the vast majority of the things I thought I couldn’t understand were in fact quite simple! I just didn’t yet know the jargon, which made the concepts sound significantly more complicated than they were. “Implementing a new entry point (available to users) utilizing a pre-existing API endpoint” is equivalent to the sentence “creating a button”. The first sentence is far more information dense; however, effective communication is not measured by how much information you can cram into one sentence. Not to mention the fact that if you don’t recognize one of the jargon words in that “information dense” sentence, it loses all meaning, while the second is universally understood.

     I don’t believe this is a malicious attempt by software engineers to feel or appear intellectually superior. To my knowledge, there’s no cabal intentionally pushing the over-use of complex language; I believe this is a byproduct of the fact that you must be incredibly precise with computers. One might believe, then, that it naturally follows that the language around computers should be incredibly precise, right? I’d argue no. Unlike computers, humans have the capability for abstract, generalized thought – let’s use it to make computer science more widely available and welcoming to new groups of people who want to learn the discipline. 

    I think computer science could do with a similar dichotomy of language to medicine. As an example, the medical world has the technical term “xerosis”, and the layman term ‘dry skin’. We need to get better at understanding what circumstances require what level of precision in speech. I think we’ll find if we lower the barrier to entry for computer science, the field will flourish with new ideas, perspectives, and ways of thinking that may just give us a future of new technology we cannot yet imagine.


    1.  Rosenstein, Adam, et al. “Identifying the Prevalence of the Impostor Phenomenon
      among Computer 
      Science Students: Proceedings of the 51st ACM Technical Symposium on Computer Science Education.” ACM Conferences, 11 Mar. 2020, https://dl.acm.org/doi/10.1145/3328778.3366815. 
  • Bees Love to Play!

    Bees Love to Play!

    Breaking news! Playing isn’t just for vertebrates!

    In a recent study at Queen Mary University of London, researchers Hiruni Samadi Galpayage Dona, Cwyn Solvi, Amelia Kowalewska, Kaarle Mäkelä, HaDi MaBouDi, and Lars Chittka discovered that bumblebees are very far from emotionless, unfeeling worker drones. In fact, the bees have been observed playing with balls and exhibiting positive feelings when playing.

    What was the study?

    Researchers constructed a small, enclosed area with two options for the bumblebees. They could either get a treat by walking through an empty path, ignore the treat for a time and play with the surrounding wooden balls outside of the path.

    Figure 1

    Although there was no obvious incentive to rolling the balls, the bees rolled the balls around 1-117 times during the experiment.

    In another experiment, the path the same as before but was colored two distinct colors. The initial activity was similar to the first run of the experiment. However, after removing the balls, the bees still showed an interest in the color that was associated with the wooden balls.

    Figure 3

    Figure 4

    Figure 10

    This is a crucial discovery, as it shows that the bees are interested in the balls for no other reason but to play with them!

    Bumblebees and Their Playfulness

    During the researchers’ experiments, they discovered many interesting things about the which bees were playing and why. They found out that, much like human children and other baby animals, younger bees were more likely to play with the balls than older bees. Also, adult male bees played for longer than their adult female counterparts.

    Why do they do this? What do they get out of rolling the balls? The researchers claim that bees have no need to roll the balls for anything other than enjoyment. This means that the bees are genuinely playing just to have fun! They come back to the balls repeatedly to continue their play, even with real incentive from doing so. This is groundbreaking in the understanding of insect minds and how insects may feel a lot more than we give them credit for.

    Conclusion

    This study has allowed us to see that other living beings on Earth experience positive emotions and feel much more than we may think they do. I hope that this is the kick-starter for much more research into the brains/thought processes of other living beings. I am sure after hearing all of this, you want to see the incredible cuteness of bees playing.

    If you would like to read more about this discovery, below is a link to the full study:

    https://www.sciencedirect.com/science/article/pii/S0003347222002366?via%3Dihub

    (All credits go to the researchers and Queen Mary University of London)

  • Why Design?

    Why Design?

    One of the most challenging questions I am asked as a designer is why I chose the study path I chose. I am often asked Isn’t that just the same as being an art major? or Why not choose something more useful like Computer Science or Engineering? Sometimes, I ask myself those same questions. What exactly is it that I am doing?

    In my mind, the word “design” brings up many different images. Often I will picture a fashion designer with measuring tape and a model in front of her, or a car manufacturer sitting in a dark room with only a lamp as a source of light sketching the future of the automotive industry. I even picture a mad painter brushing frantically across a canvas creating a new masterpiece. The word “designer” meant so many different things that it was nearly impossible for me to know the true definition. All I knew was that all designers shared a common trait: their creativity. And, as luck would have it, I would spend my first several years of life developing my creative side, leading me to where I am today.

     For as long as I can remember, I have loved making things. It sounds cliche, but it’s true. I used to collect scraps of paper, out-of-shape paper clips, and many other things considered “trash” and assembled them into tiny sculptures as gifts for my friends and family. I was especially guilty of trash collection in school. My 2nd-grade teacher constantly criticized my never-ending mess, until the end of the year came. She chose to look beyond the mess inhabiting my tiny desk and focused on the small figures. From there, she deemed me the “Class Creator”. It was one of the first memories I had where my art was recognized by someone who wasn’t a relative or a  friend of my parents. Of course, the support of my parents played a significant role in my decision. They were the ones to shine the light for me, guiding me to where I needed to go.

    Fast forward several years and it’s finally time to apply to colleges. As a Junior in High School, I was expected to have already a list of schools I wanted to visit and, possibly, apply to. Like many others before me, I was completely lost on where I wanted to go, let alone study. I couldn’t decide if I wanted to go to a big or smaller school, out of state or in the state, and traditional or technical. This indecisiveness led me to begin my college search more locally because “it makes the most sense” as my mom put it. And she was right. I was enchanted by the schools neighboring my home: UGA, Emory, and Georgia Tech.

    While filling out my applications, I was unsure what I wanted to study. In the end, I decided to apply for mechanical engineering programs. At the time, it seemed like a sensible choice, given that it involved the creation of things. However, engineering focused on the more technical aspects of design, the “mechanics” if you will. As cool as that sounded, the thought of performing primarily calculus as a career for the rest of my life terrified me. My life would become mathematics. My creativity would be confined to the laws of physics and thermodynamics. As much as I tried to convince myself that that was what I wanted, it wasn’t. 

    Stumbling across the School of Industrial Design’s webpage was a godsend. It looked like what I imagined I would be doing as a mechanical engineer, only more eye-catching. I saw the beautiful designs that other students had developed and the effort they put into the aesthetics of the designs. It was everything I had been searching for. It was exactly what I wanted to do.


    Industrial Design. The second I decided to scroll through the Launchpad Portfolio on this secret website I had just discovered, I fell in love. Hard. Seeing students take their artistic abilities and create new things for people not just to enjoy, but use? Everything changed for me there. No longer was I doubting the decision to transfer to Georgia Tech, I simply changed the way I went about it.  I finally understood what being a designer meant. My choice to become a designer has been one of my best.

    Works Cited

    https://www.degreequery.com/wp-content/uploads/2019/01/industrial-vs-eng-smart-660×445.png

    https://th.bing.com/th/id/OIP.zXqHiS3fKQLuQQCC5Q9-IQHaCl?w=293&h=122&c=7&r=0&o=5&dpr=2&pid=1.


  • LaTeX: A Typesetting Guide

    LaTeX: A Typesetting Guide

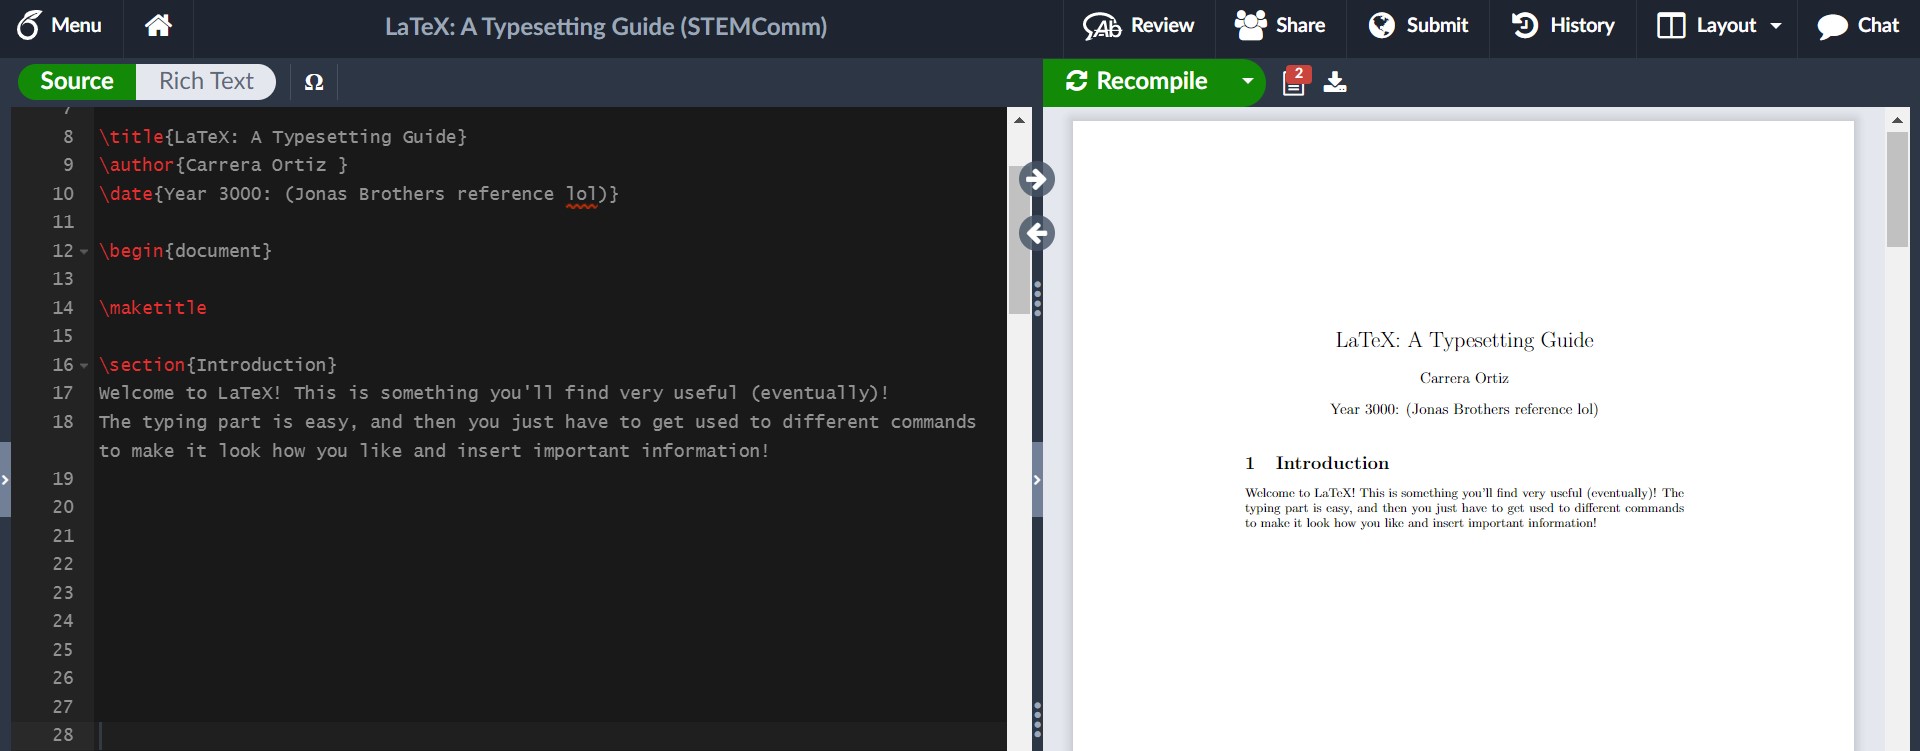
    As an aspiring scientist, I look to encourage as many people as possible to read what knowledge I can share. Technology has made that incredibly easy, as proven in history by the boon caused by the printing press. A huge proponent of sharing information is the accessibility to a wider audience, and part of that leads to a discussion on aesthetics and formatting. Even now, I’m aware of the way that each indent in this article will help make it easier for you, the reader.  In science, there is so much data and foundations to cover to be able to support all of these knowledgable ideas and to get to that quicker, the LaTeX Project has made it easier to streamline all of this together so that scientists can do what they do best – share their knowledge. Now, I hope at this point you’re aware that the LaTeX project has nothing to do with gloves commonly adorned by doctors, or the red suit that Velma (our new lesbian icon) wore in the Scooby-Doo live-action movie. If not, let me explain. From the site itself, “LaTeX… is a document preparation system for high-quality typesetting… often used for… technical or scientific documents,” (The LaTeX Project.org). During a semester where all but one of my professors strongly encourages submitting all work in LaTeX, and previous reports submitted under the guidelines of the American Physical Society, I felt it part of my duty to share some wisdom on the subject of writing in LaTeX.

    To start, I use the online tool Overleaf to work in LaTeX, but there are other options such as TeX maker to start your LaTeX journey. My personal preference is Overleaf, but TeX maker may be helpful if you often find yourself without internet connection and still needing to edit your .tex files. 

    When creating a new project, I try to keep in mind what my purpose for the document is, and if I need a specific template (either offered through Overleaf or some I have made on my own). Often, I just make a copy of the template I have made for homeworks and continue editing it to the specifications of the class I am using it for. Othertimes, I’ve used some of the resume templates to try my hand at that. Of course, each project is different, so its good to experiment on your own with different possibilities!

    In all projects, there exists the title and metadata, where I can note that I am the author, list co-authors, the date, and more, all contained within the preamble section. The preamble section is where the outline of the formatting is, and a bank for all the tools you may need as you go. One of the most useful parts of the preamble is the selection of packages you include, as it widens your ability in what you’re able to accomplish in the document. For example, if you would like to show images, there’s a package called graphicx to help neatly organize the image onto the document and minimize the struggle of neatly fixing it in place. As a physics major, the packages I might use most often are: amsmath, amsfonts, amssymb, graphicx, physics, sinunitx, mathtools, verbatim, and more. You may find some other helpful packages for your own use! Moreover, the preamble is where it is stated what class the document falls under – such as article, report, book, and so many more options with even more available modifications.

    Then, the document begins. Literally. The first environment, typically indicated with the “\begin{ }” (and “\end{ }”) command,  is introduced immediately after the preamble, as the document is its own environment. Whatever is typed outside of the environment will not directly be reflected onto the pdf version (unless it is formatting stated in the preamble). If I were to re-create this article in LaTeX, the first thing I would do in the document environment would be to use the command “\maketitle” so that it could take the title from the preamble and format it neatly. I could also make a section called the Introduction to let you know what the paper was all about! Sections are helpful to organize the document to make it easier on the reader, and can especially be helpful for lab reports. To create sections, you’d use the “\section{}” command, where you’d put your section title in the argument of the command. For example, let’s make an Introduction:

    And without touching any fonts, bold, or anything like that, we have the start of a LaTeX article!!!

    Before continuing on, allow me to clear up some basic syntax of LaTeX. As we’ve seen with the “\section{}” command, we have arguments (args) that are usually represented with curly braces: {}, and in some cases extra parameters are in straight braces: []. One common example is “\usepackage[utf8]{inputenc}”, where this (as far as I know) is a basic formatting setting. With the section command, we inputted “Introduction” to the argument so that we could name the section. Additionally, like most programming languages, there is a way to put comments in the coding portion of LaTeX that doesn’t show up in the pdf version. This is very helpful to explain new commands you’ve created or directions for a template. The comment is indicated with “%”. Anything typed after this on a line will not show up until you go onto a new line. If you would like to manually create a vertical spacing delimiter (in other words, a new line), you can use “\\”. This is not indented for the next paragraphs you may start. For horizontal spacing delimiters (simlar to the tab key) you can use “&”, which you will most commonly see in creating tables. These are the most likely syntax related things you will come across (other than the escape key)!

    As helpful and streamlined as this all is, many people may still prefer to use Word or Google Docs over this. So why use LaTeX? Two words. Math mode. It’s important to note that math mode has its own syntax, but it isn’t too much more! In STEM, math mode is extremely helpful because it allows you to easily format and include equations and other mathematical work.

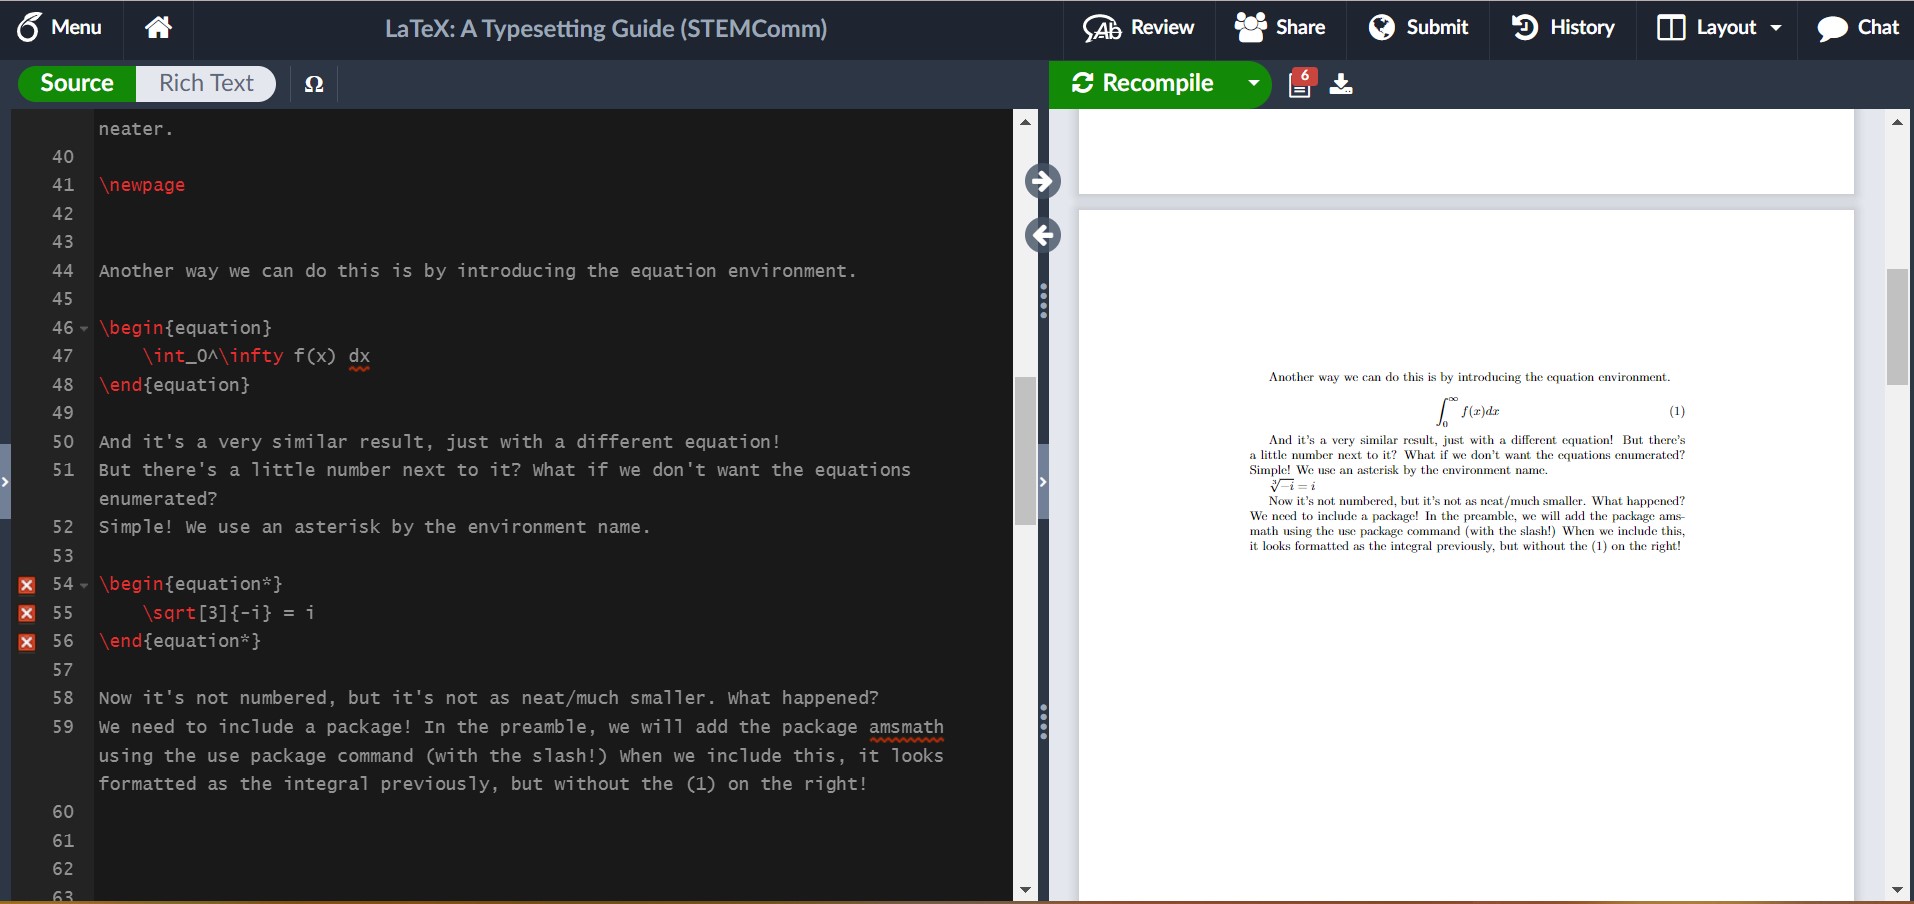
    Some common environments in math mode include equation, gather, and align. Gather and align can help a lot more when there are multiple relevant pieces of mathematical information at once so they can be formatted well. The equation environment is helpful for textbook-style math where you can choose to number each one or not!

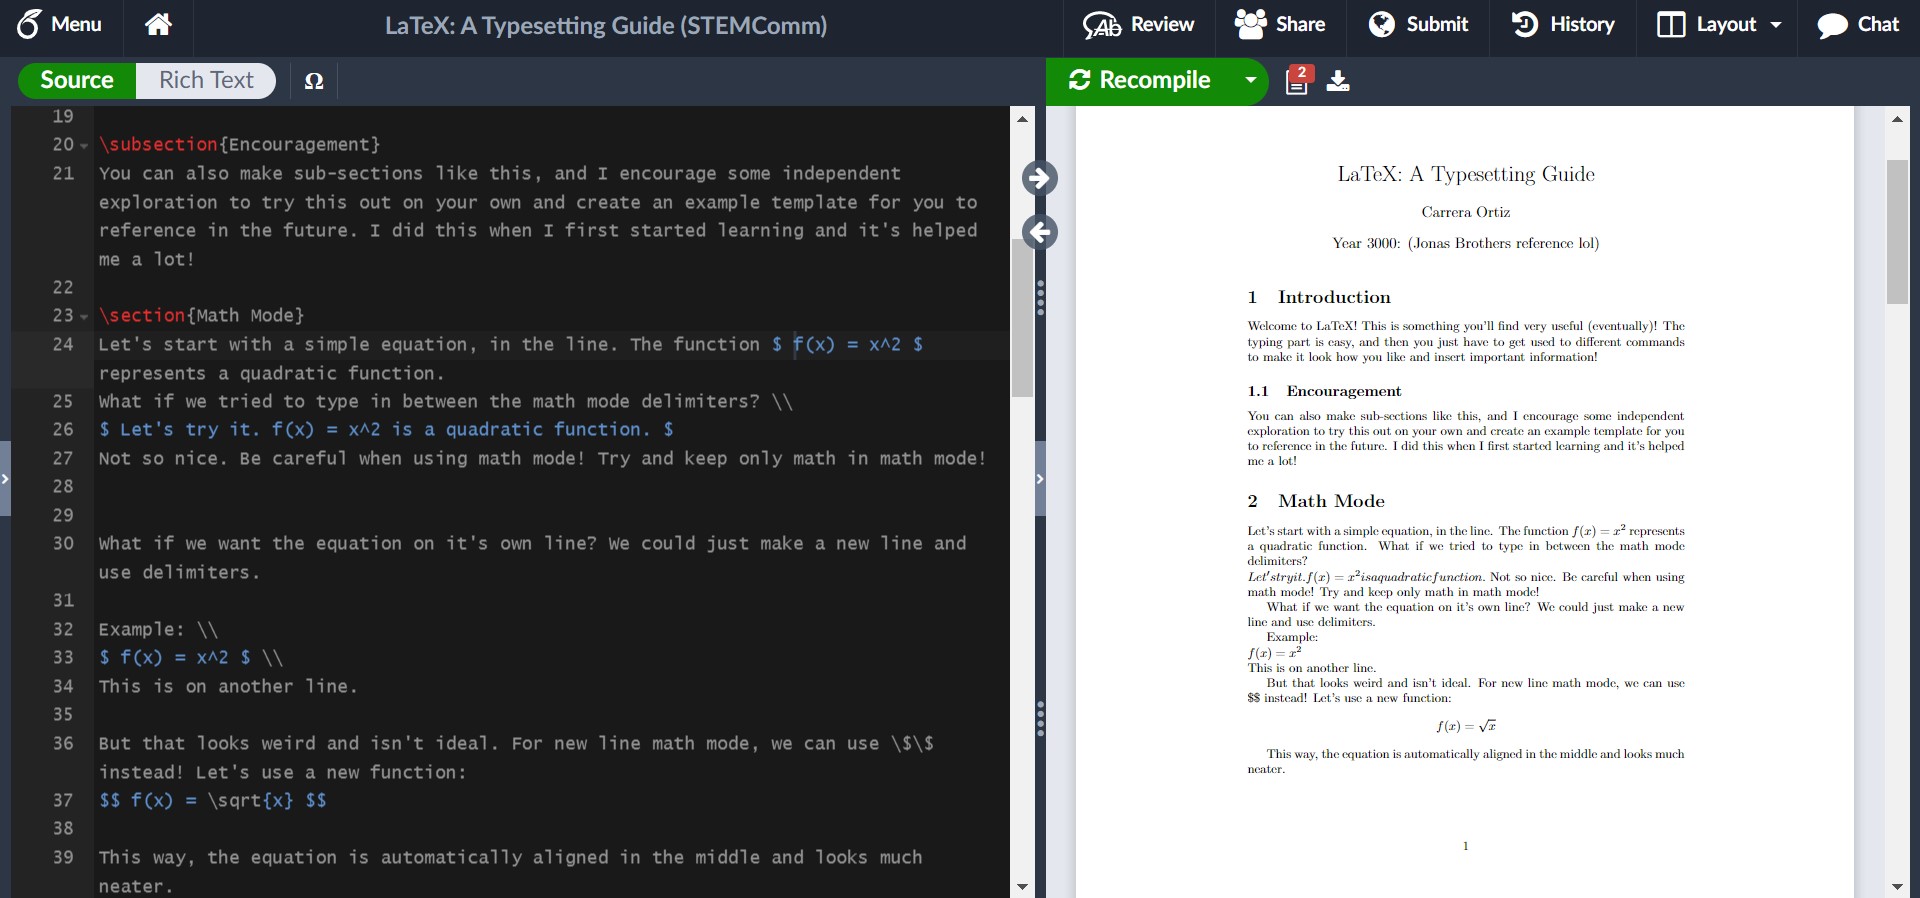
    Something else in math mode that is common, be it for a homework problem or simple discussion of the math, is using in-line math. This is where you don’t isolate the equation from the paragraphs, but simply keep it in-line with the words so that it’s all one neat paragraph. Let’s try it!

    This example shows the syntax for in-line math mode and newline math mode. For in-line math, the math is wrapped around single dollar signs on either side, such as how we had $ f(x) = x^2 $. The newline math, which is good for exemplifying results, work, or important equations that will be referenced later (something the equation environment makes easy), is wrapped around double dollar signs. In this example, we had $$ f(x) = \sqrt(x) $$.

    I hinted that the equation environment is numbered (like you’d expect to see in a textbook), but you can opt-out of this! Let’s see what this is like in LaTeX.

    In this example, I showed us running into an issue where we needed a package. It’s not always easy to tell what the solution is to an issue, but here, google is your friend and luckily it isn’t too hard to find! I encourage you in your own example of trying out LaTeX to include the package and see what it looks like fixed!

    For some common math symbols or uses, like exponents or square roots, it may be easy to just let it become muscle memory to do it, but for more complicated commands like for summations or limits, you can create a table for yourself to reference. (Hint: There’s luckily also another option I shall share if you wait a couple more paragraphs!)

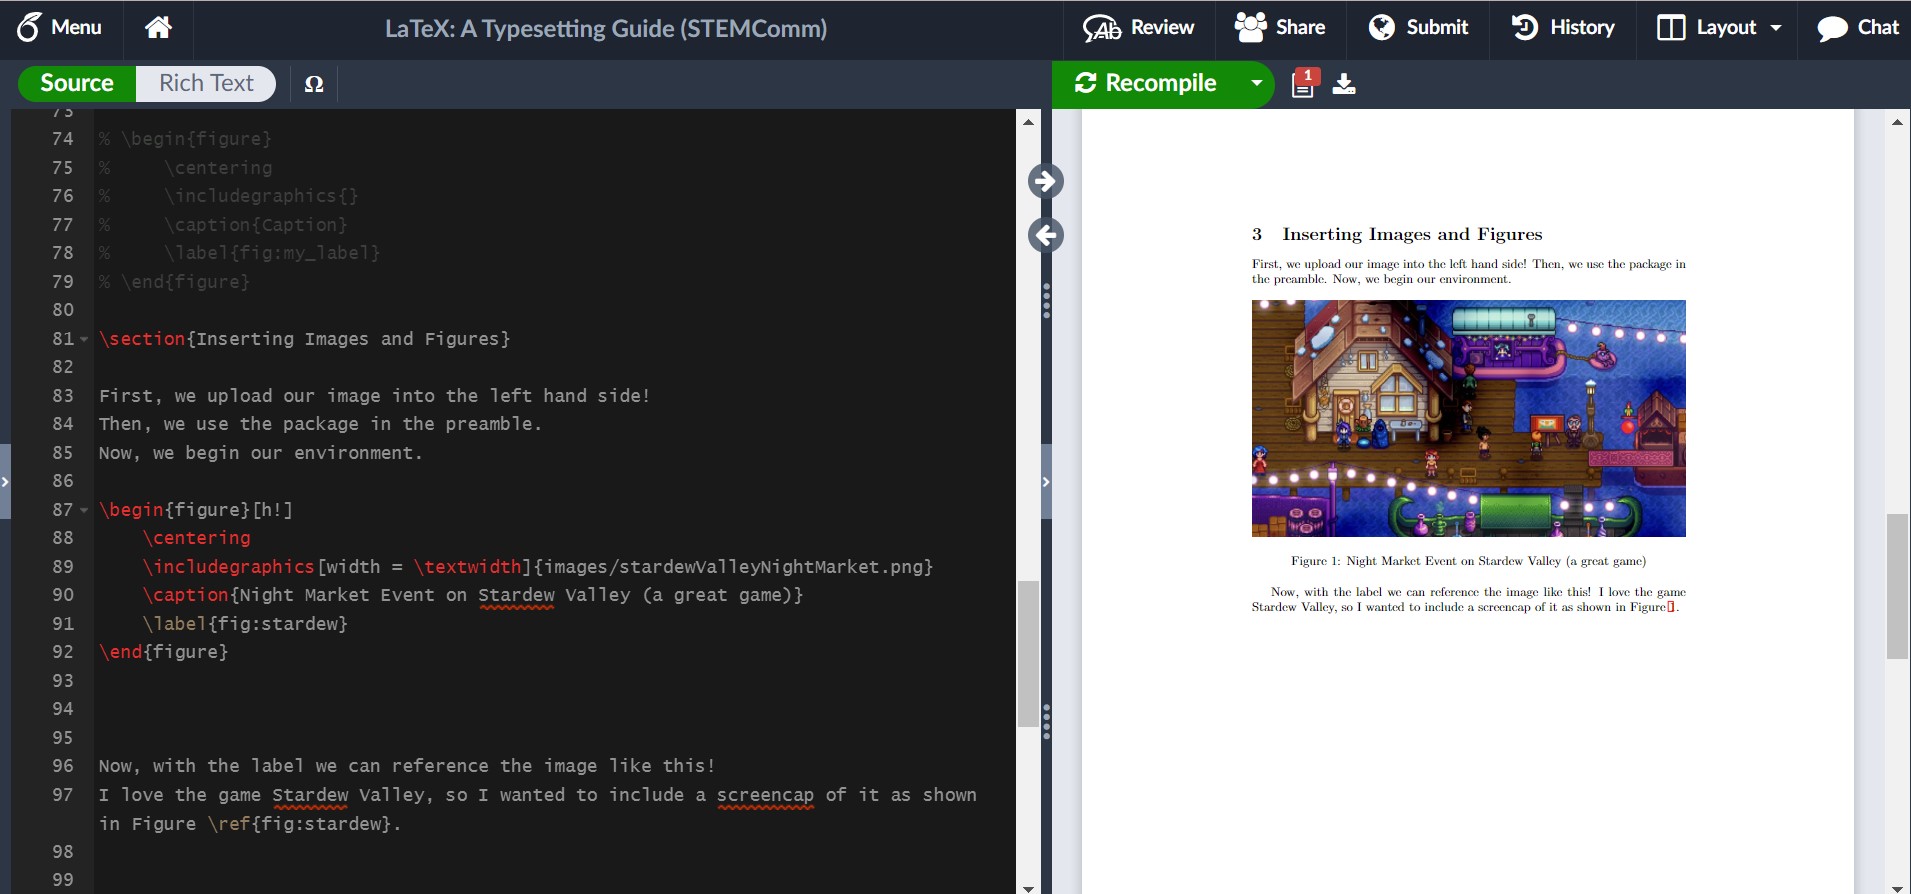
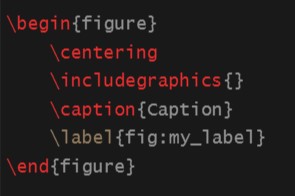
    Another thing you may want to include in your LaTeX abilities is including images, just as I have done in this article! It’s unfortunately not as intuitive as math mode, but Overleaf does a lot of the work for you still! Images are considered figures and are formatted through the figure environment. My general suggestion is in the file outline to create a folder for your images and upload them into there! To use the figure environment, you should insert a new package called graphicx into the preamble. By converting it to the figure environment, you’re given more control over where it is and the dimensions of your image, as well as some ability to caption and reference it. If you’re uninterested in the extra help, you can simply use “\includegraphics{yourImage}”.

    To use the figure environment, you can simply type \begin{figure} and press tab, then Overleaf should finish the basics of it for you. This should look like:
    Now, I will show you what it could look like with some editing in LaTeX!
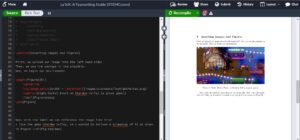
    As you can see, I included some specific edits to control how I wanted the image to look. I controlled the width, what reference I used to make it easy for myself, and where it was in the article. If you want an image on a page of its own, you can use [p!] instead of [h!] next to the begin figure environment command. Additionally, there are ways to have grids or side-by-side pictures, so its something to play around with more!

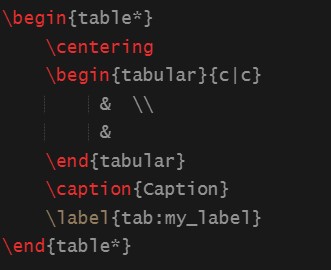
    Last instructions: Data Tables. Science is very reliant on data, so it makes sense that a lot of people interested in STEM might want to know how to include data tables in LaTeX. Expectedly, data tables have their own environment. The basics look like this:
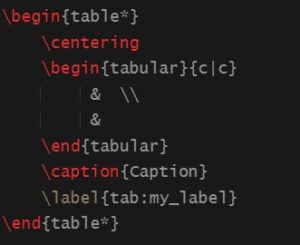
    There are some recogizable things, like the centering command and the caption and label. These work just the same as the figure environment. The tabular environment within is noticably different. The columns of the table are controlled by the {c | c} arguments. If you would like more or less columns, you can alter the amount of c’s (but be sure to include the ‘|’ delimiters). The table is actually all written in the blank area with the ampersands and new line delimiters, which you may have recognized in my previous notes on syntax. Here, you may have something like:

    Column 1 Title & Column 2 Title \\

    data row 1 col 1 & data row 1 col 2 \\

    data row 2 cold 1 & data row 2 col 2

    to showcase your data. I would experiment with this on your own! For example, you can look at the Pokedex and list some Pokemon and their types/health/attack and more to try it out! It gets a little tiring, but eventually I’ll share some nice resources to make this easier as well!

    Now, with some nice writing and composition skills, plus the ability to insert some familiar math into LaTeX, I would like to introduce some resources that will change the life of anyone who has not already figured this out. These few resources will absolutely help anyone using LaTeX to “work smarter, not harder”.

    For example, there are plenty of different symbols and functions that I might need for a paper, and it’s not always as intuitive as writing out the name of the greek symbol after the escape key (but luckily sometimes it is). This is where Detexify comes into play! There are other similar resources for equations, but I have enjoyed this one the most. Detexify allows me to draw the symbol I would like to include in my document, and not only will it show me the command for the symbol, but it will also tell me what package it belongs to and what mode it is used in. For example, if I want to indicate “there exists a real number x” symbolically, I could spend some time googling each specific thing and then write it down and hopefully remember in the future. However, through Detexify I can draw the symbols I need and find out that the symbol for a real number uses the command “\mathds{R}” in math mode through the package dsfont. I find this quicker and more helpful than just knowing the relevant command to use, and a little better than referencing a table every time! You can find this website at https://detexify.kirelabs.org/classify.html.

    Additionally, data can become very length-y very quickly and make creating data tables excrutiating. Even some small tables can take a while to set up through LaTeX without a quick way to do it. However, there’s actually a convenient website where you can set up a table for any data you would like to show in a quick and easy manner (as you might in MS Word or another similar processor), then it produces the LaTeX code that corresponds with what you’ve entered. I only wish that I had found this when I was actually taking my Advanced Lab I course and didn’t spend an hour just filling in data I had written on paper into the document. You can find this website at https://www.tablesgenerator.com/.

    Also, there is indeed a LaTeX wiki for any other things you may want to look at (including a section that goes in more detail on images).

    The irony is not lost on me that this article sharing my LaTeX knowledge is not written in LaTeX. However, when I first learned to use it, I wrote everything out in my own personal article where I experimented with all of these things and more. It was also extremely useful for me to look back on in case there was anything I knew I had done before and just needed a quick reference on how I did it and what the result looked like. I strongly encourage everyone to practice in their own article and learn something new! Maybe, after reading this article, you’ll find you also want to share some fun tidbits of information in the neatest and best way possible: LaTeX!


  • Marine Birds Fly Into Storms to Survive?

    Marine Birds Fly Into Storms to Survive?

    In a recent article written by Freda Kreier, I learned about a very interesting phenomenon that some researchers have discovered. Many different species of seabirds have had their behavior studied during typhoons in the seas around Japan.

    What’s going on?

    Let’s get straight to the point. Some seabirds are flying directly into storms! The observations of the birds’ behavior differed greatly when a storm was present and when one was not. It’s as if the birds sense the storm coming, and head to the center. An example of this behavior can be seen in the following video:

    In this video, the various colorful paths are flight paths of streaked shearwaters and the black path is the path of storm “Soulik” and typhoon “Jebi” respectively. You can see that as Soulik approaches, many of the birds alter their course directly into the direction of the storm. Then, right after Soulik, Jebi appears and the birds nearest to the typhoon engage in similar behavior.

    You can find more evidence of this behavior in different scenarios in this research article: https://www.pnas.org/doi/10.1073/pnas.2212925119

    Why?

    Now, let us discuss why on Earth this would be happening! As discussed by Emily Shepard, a contributor to the previous research article, during a storm, birds at sea have nowhere to go. Their options to choose from are not ideal in the slightest. Birds can either go inland if they are close enough, or stay out on the ocean.

    Two Choices:

    Go Inland

    Even though going inland may seem like an obvious safe option, it is often much safer for these birds to stay out in the ocean. If a bird were to stay near shore during a storm, it runs the risk of being blown onto land or hit by debris carried by the strong winds.

    Remain At Sea

    Being at sea during a storm instinctively sounds dangerous to most people. However, it might be the safest option! If a bird were to go towards the storm, it has the ability to coast along, riding on the winds of the storm. An analogous situation might be when a person gets swept out to sea by a riptide. In that scenario, the best course of action is to float and allow yourself to be carried by the current. If you fight it, you will become tired and possibly drown. I believe this is why the birds do this. It makes sense to just float along with the winds and preserve your energy until its over.

    It is also important to note that the birds already inland do not seem to participate in this behavior. I believe it is more of a “spur of the moment” type of situation. If a bird is out on the sea, they have the choice to exert themselves fight the storm to get to shore, or ride the storm through.

    Although this whole situation seems outlandish, when we dive in and really think about the birds’ choices, it ends up making a lot of sense!

    Sources:

    https://www.sciencenews.org/article/seabirds-typhoons-shearwaters-survival#:~:text=Some%20seabirds%20don’t%20just,the%20National%20Academy%20of%20Sciences.

    https://www.pnas.org/doi/10.1073/pnas.2212925119

  • Dressing Up as Dora for Science

    Dressing Up as Dora for Science

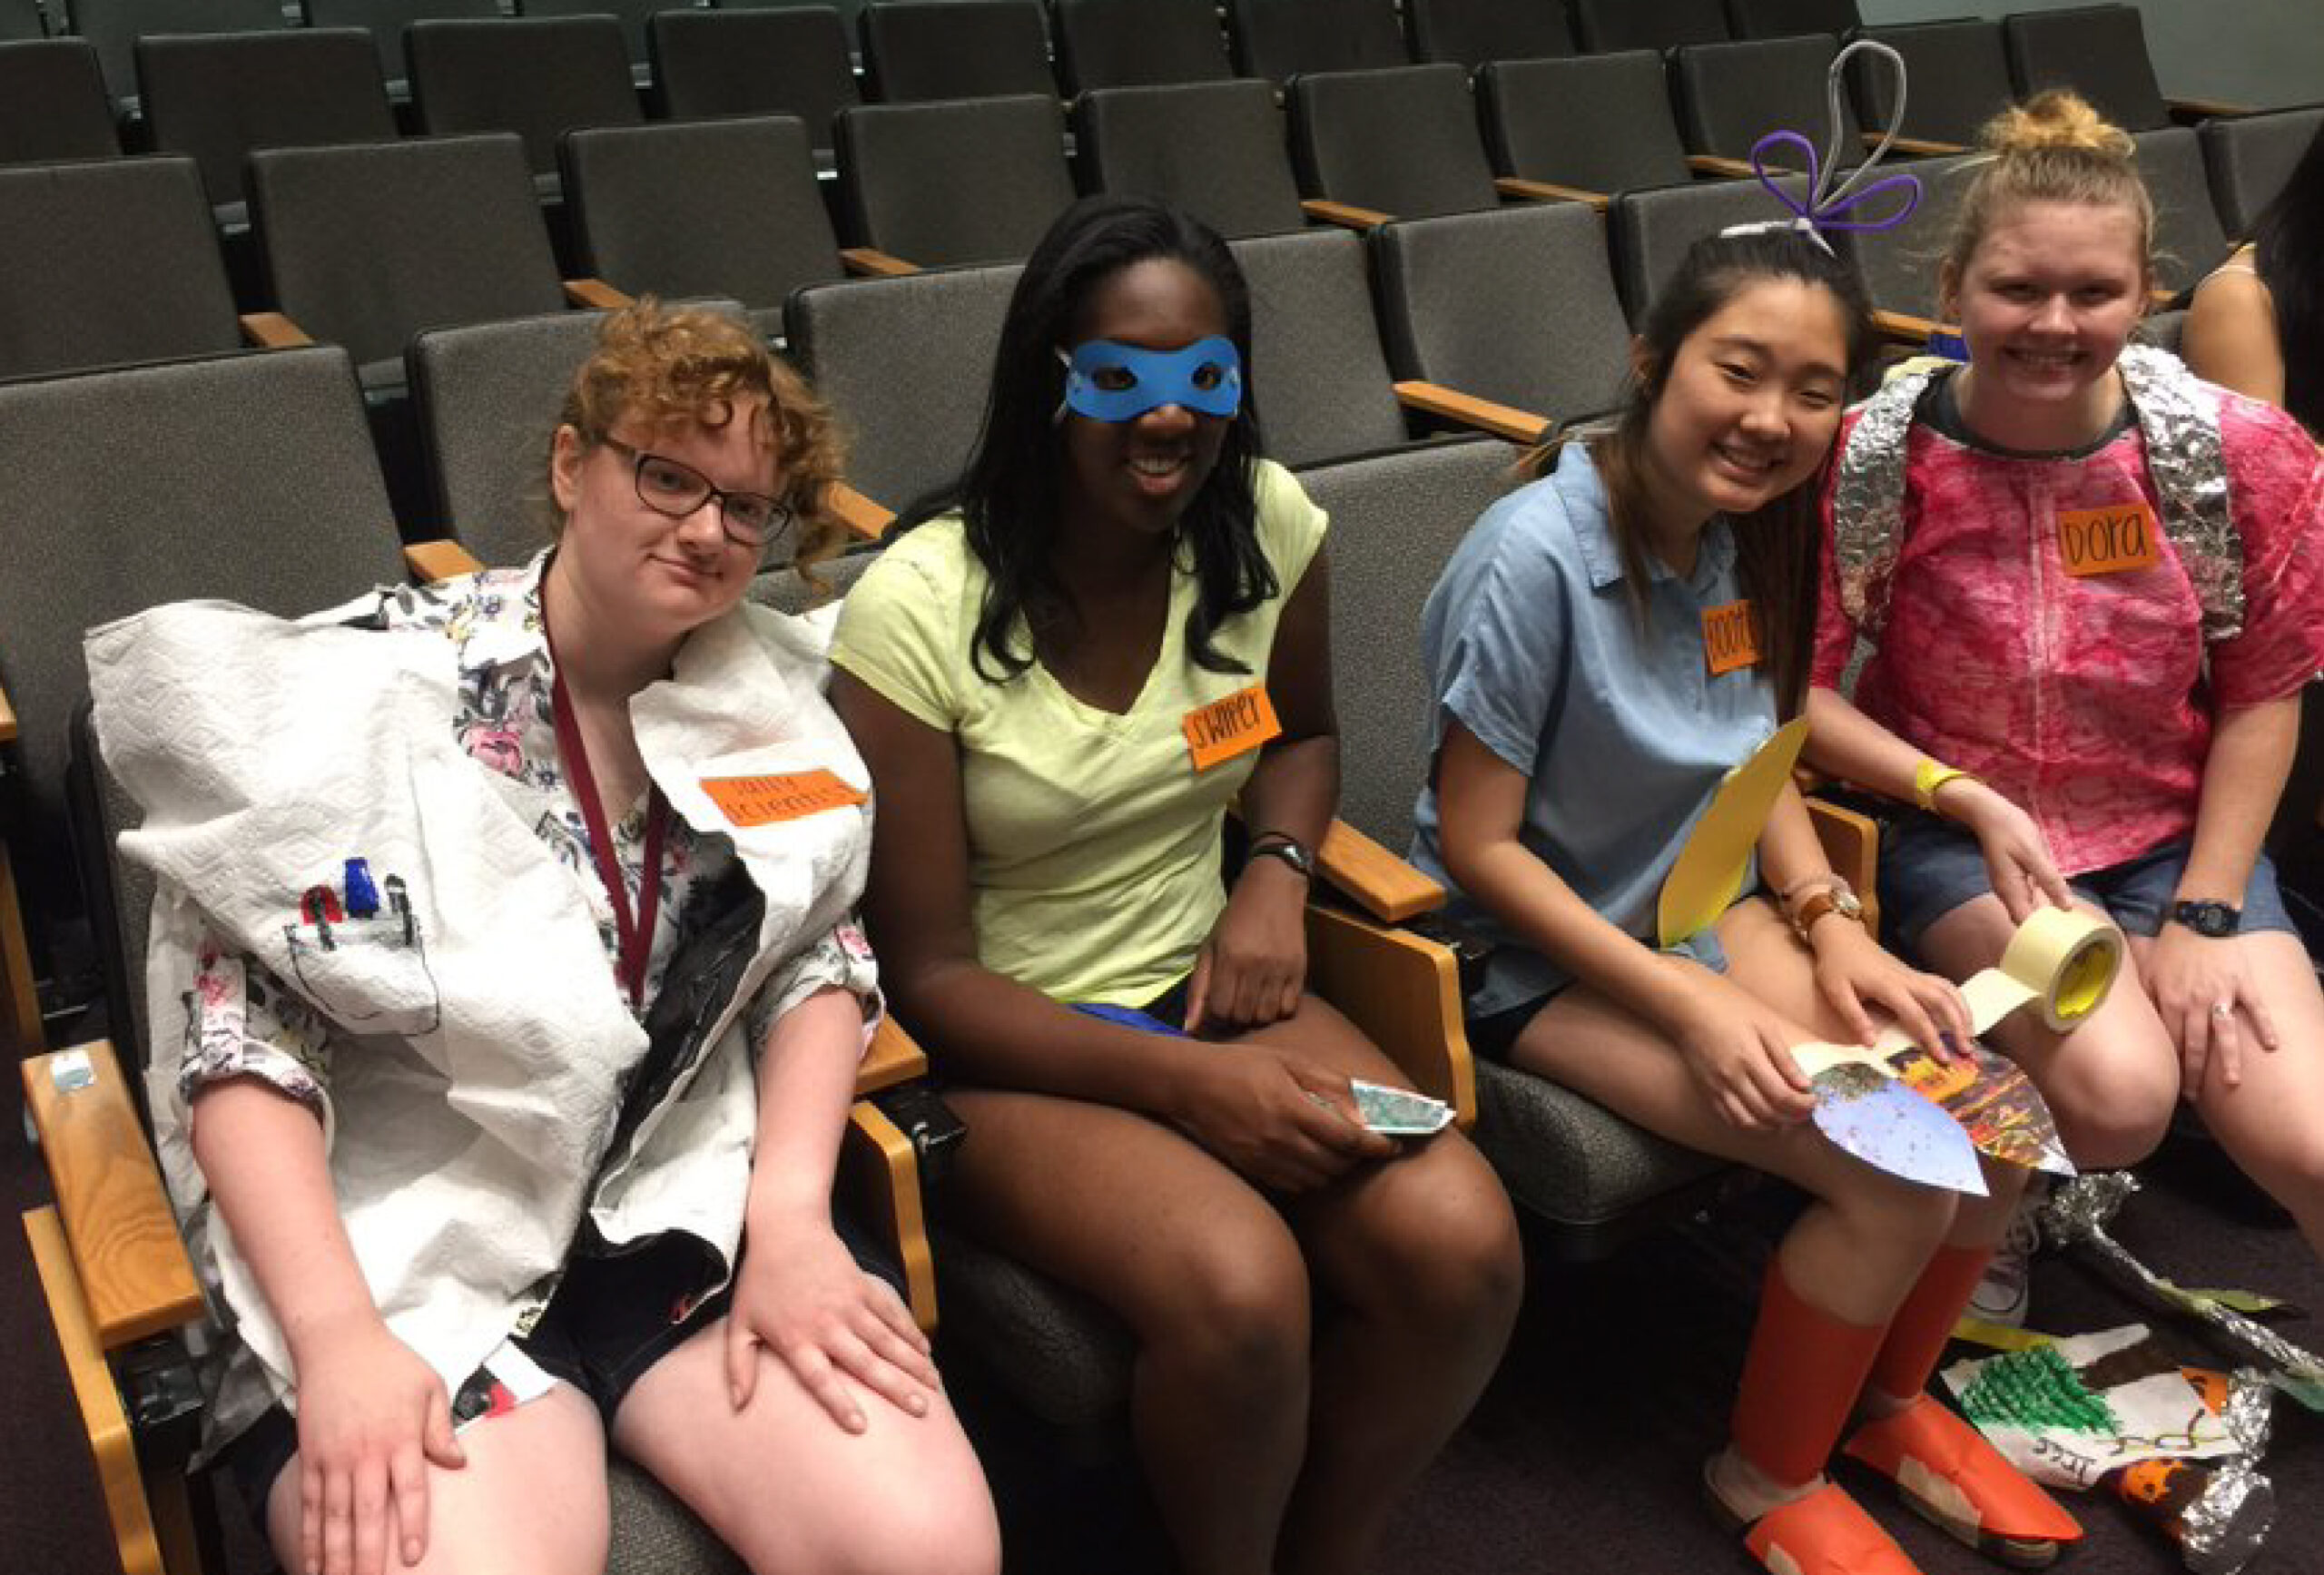
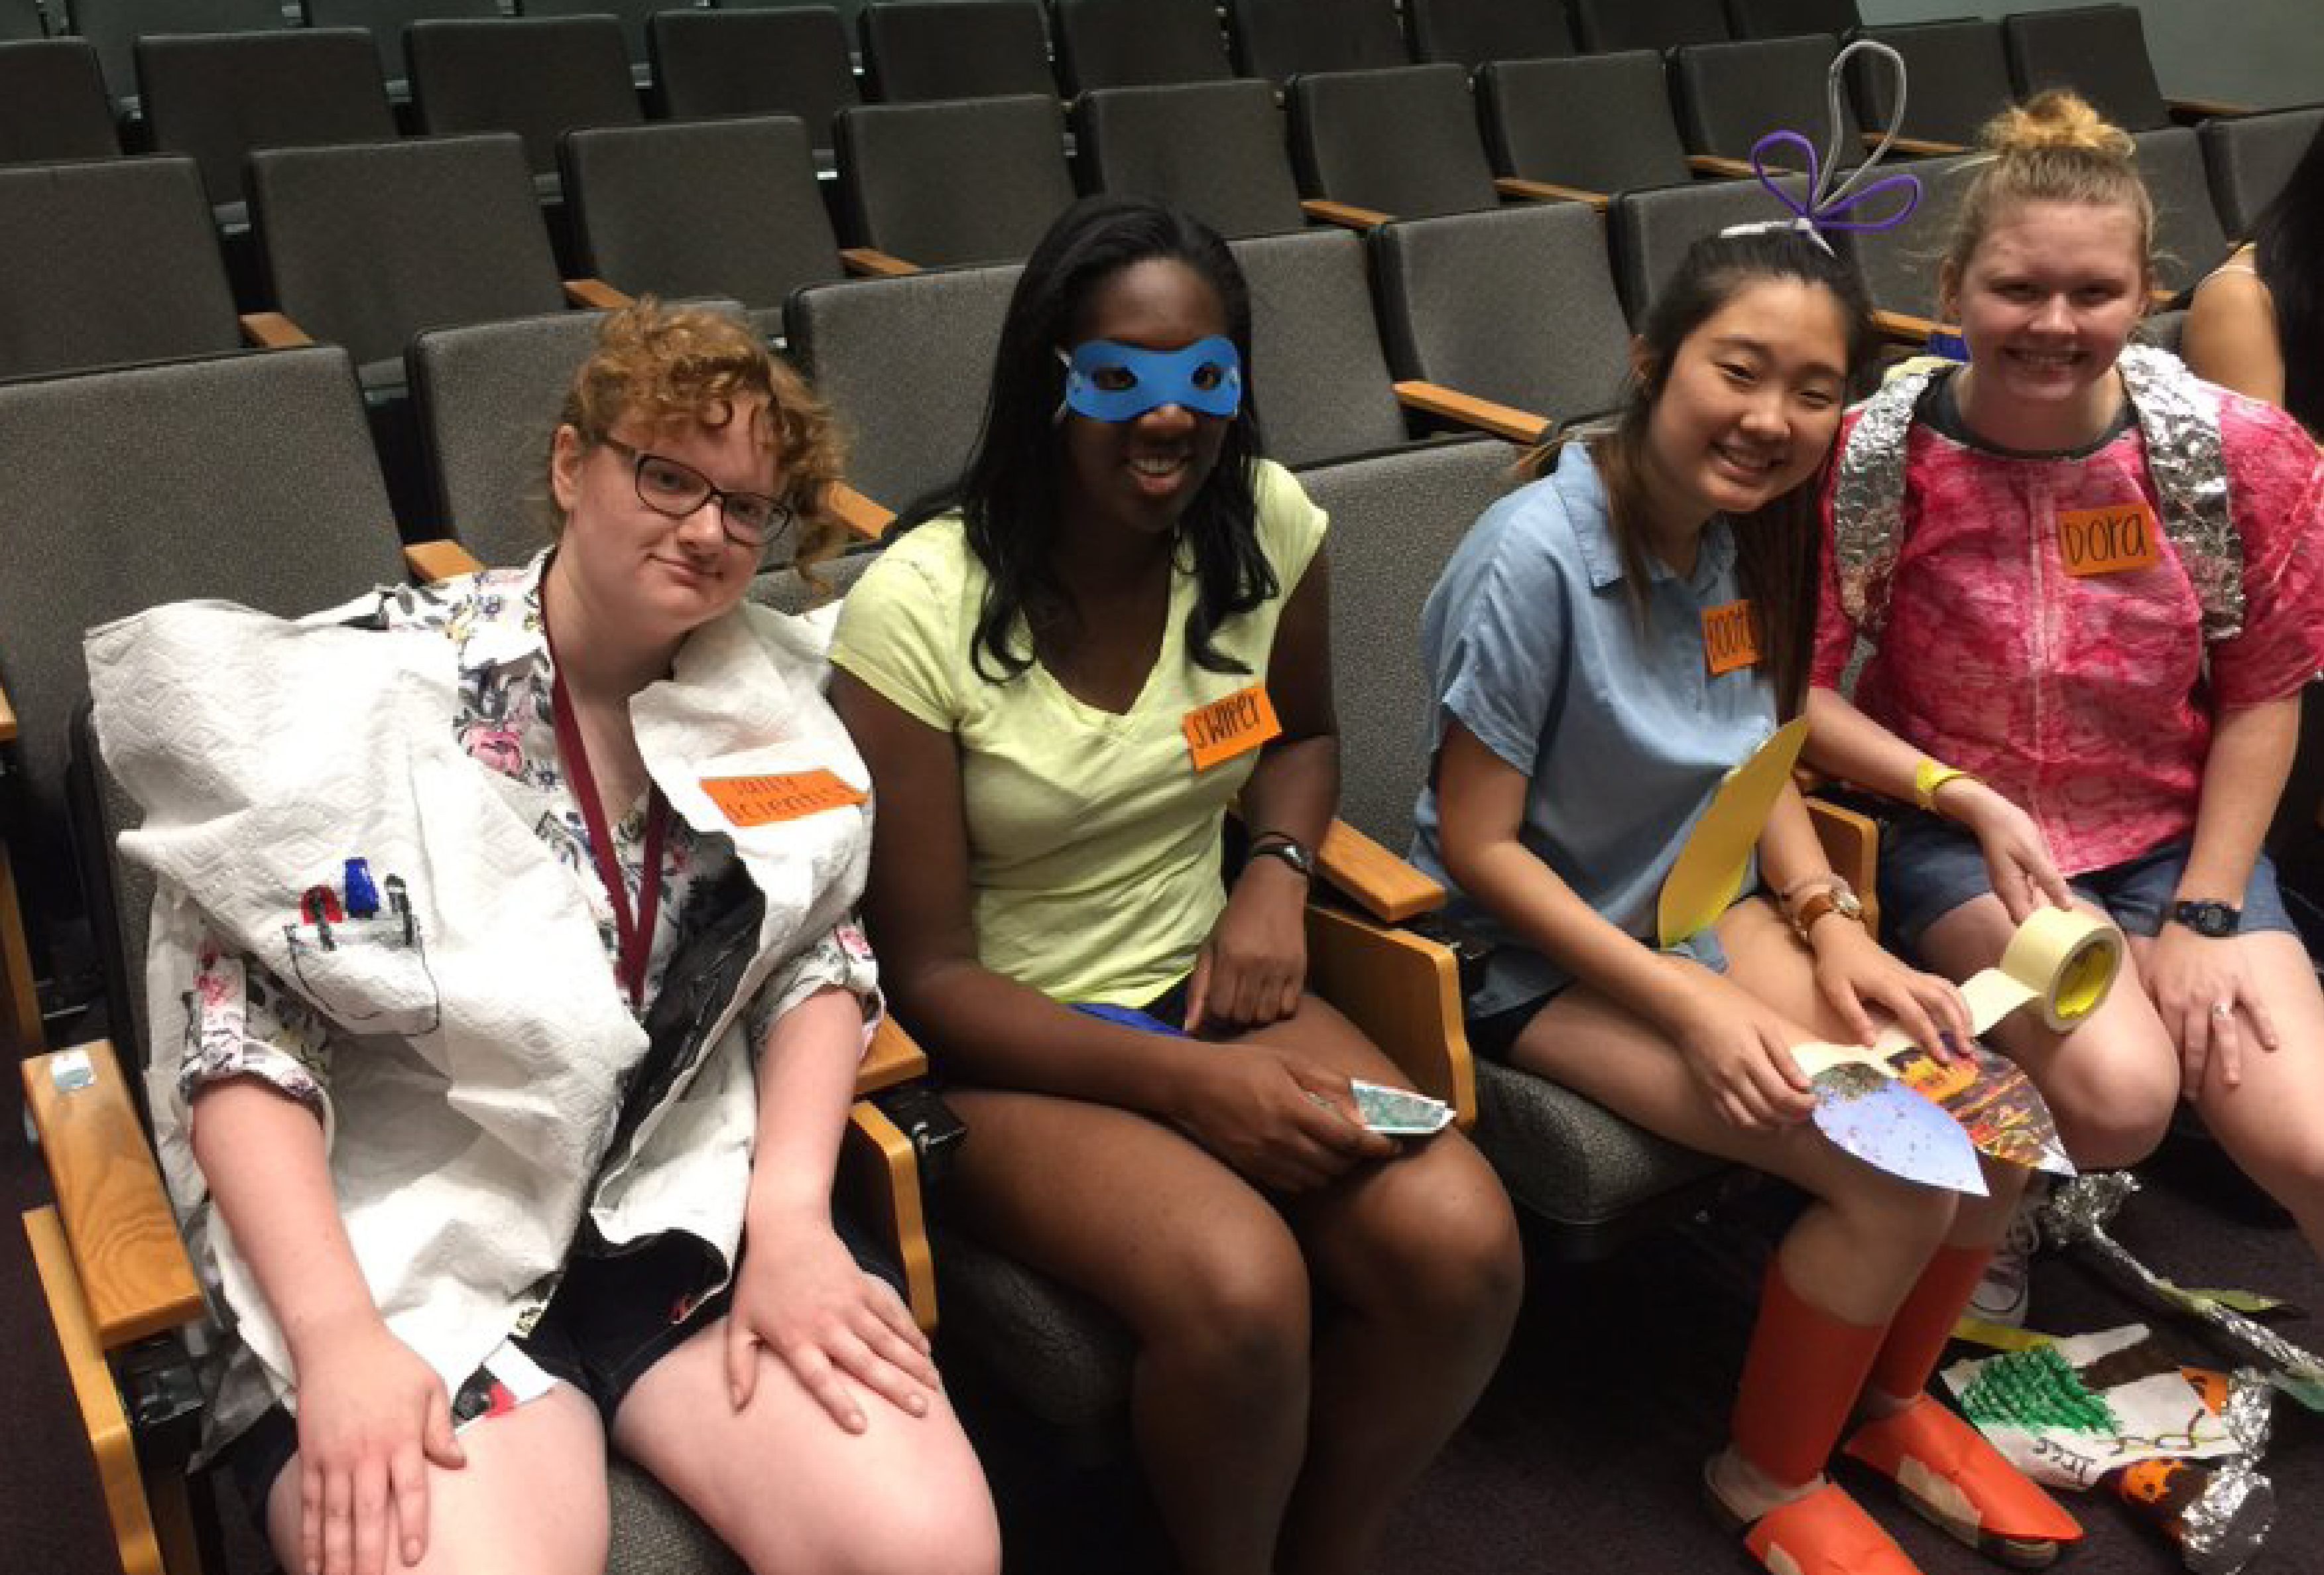
    What’s the first thing you notice about this photo? Maybe it’s the girl in the paper towel shirt with a tin foil backpack posing as Dora? Or maybe the girl with the construction paper boots or the girl with the Swiper paper mask? Or maybe you see me in the paper towel lab coat pretending to be a scientist character in the Dora cinematic universe.

    Why are we dressed as 5-minute craft Dora characters, you might ask? Well, in the name of science, of course! Specifically, as part of our team’s Presentation of Action on our solution to a Biosecurity problem scenario set 20 years in the future. Ok woah, a lot of exposition. So let’s throw it back and break down one of the most useful organizations for youth interested in STEM, Future Problem Solving! 


    Alright, what’s Future Problem Solving?

    Sounds like a bunch of buzzwords slapped together, but there is a reason for this I promise!

    Future Problem Solving (FPS) is an international program for K-12 that teaches students critical and creative problem-solving by training them in a six-step problem-solving model. A quick run-down of the steps:

    1. Identify Challenges – Given a complex, real-world scenario, what are some problems you can identify? Usually students will use a category list to try to identify problems of a diverse nature.
    2. Select an Underlying Problem – Out of all the problems identified, which problem is the most impactful on the scenario? Think – if we solved this, other problems might also be solved and the users would be the most benefited. What action verb would possible solutions need to accomplish to solve this main problem?
    3. Produce Solution Ideas – The fun part! Brainstorm creative yet realistic solutions to the underlying problem.
    4. Generate and Select Criteria – Create criteria that help you decide which solution is the best at solving the underlying problem and addressing the needs of the original scenario.
    5. Apply Criteria – Run each solution through the criteria you created and rank which one best meets all criteria overall.
    6. Develop an Action Plan – Whichever solution ranked first in step 5 will be your final solution to the problem. You need to elaborate on the who, how, what, where, why of the solution to explain how it could be implemented in the scenario and why it solves your underlying problem. (At the state and international level, teams will create a skit that describes their action plan. The limit is that for skit props, teams can only build them out of household items – hence, our makeshift Dora fits above! We created a cute Dora the Explora skit for our Presentation of Action Plan where I was a scientist explaining the research behind our action plan.)

    What makes this model unique though, is what problems are being solved (and here’s where the ‘Future’ of FPS comes in). 

    Each problem scenario is centered around a STEM-related topic, and the sky’s the limit with what areas of STEM these topics can derive from. Some of my favorites during my time included: Enhancing Human Potential, Biosecurity, Energy of the Future, Cloud Storage, Endangered Animals, and 3D Printing. Doing pre-competition research on the topic is highly encouraged, as students are given bonus points if they can describe current technology or solutions from corresponding STEM fields.

    The program throws you for another loop though by setting all these topics in a scenario that takes place 10-20 years in the future, making students not only think about the current state of the topic, but how it and its corresponding technology might possibly evolve. 

    While the program expects you to be creative with solution ideas in this field, it also expects you to understand the feasibility of current tech and how it might realistically look in the future. There are no ‘magic pill’ solutions that solve the problem with the flick of a switch allowed. You can be creative, but it’s got to be something that has a basis in our modern day to get ya points.

    So you got the basics of FPS down now. Just like with the Action Plan, let me hit ya with the WHY Future Problem Solving is an integral skill-builder for any primary school kids interested in a STEM career.


    Why You Should Force Yourself (or Force Your Child) To Join FPS

    I did FPS for 9 years before joining Georgia Tech as a Biomedical Engineering and then Computational Media major, so I speak from experience here that this six-step method of problem-solving is very similar to how both Engineers and Computer Scientists solve real-world problems in their respective fields.

    Let’s pretend we’re Biomedical/Software Engineers for a moment, and we’ve been given a specific user base that we want to design a device for that solves an issue they’ve been struggling with:

    1. To design a medical device or a computer program that’s meant to help a user base, first you need to identify what problem your users have. 
    2. Oftentimes, you’ll do user interviews and find users have MANY problems. One device can solve a few, but often due to restricted budgets and timelines, it’s not feasible to solve all the user’s problems, so you need to identify which ones are the highest priority (your underlying problem). 
    3. From then, research & design happens. You collaborate with your team on seeing what technology/systems currently exist and what are new methods/designs you can try to create that modify the current tech or are completely new from them (and you make simple prototypes of them). 
    4. Then you need to narrow down which design you want to move forward in with prototyping because there’s not enough time and money in the real-world to try to make every idea all the way from scratch to completion. 
    5. This is where you need to set up criteria to assist in deciding which device prototype you’ll choose as your action plan.
    6. Finally, once you’ve built and tested your device, you need to explain to your stakeholders and users how the device works and solves the identified problems from before. Otherwise, what was this all for besides wasting money?

    Did you see all the FPS steps in this engineering/computer science scenario? Granted, while this is a very simplified explanation, at the core, this scenario is what you do while working on projects in these fields. Even though I had no engineering or computer science experience before coming to Tech, it never felt unnatural to me when I was working on design projects because the process had already been ingrained into my being from FPS. I already knew how to critically think, so I could instead really dive into the technology I was working on and focus on coming up with solutions. Imagine starting with a leg-up at GT, and you never knew it!


    FPS, My Old Friend

    Beyond preparing me just for critical problem-solving in STEM, FPS also fostered my love for collaborating in teams. I loved the moments I shared with my teammates: Our countless recitations of topic-related vocabulary cards on the bus to the state competition in Athens, our nervous hands hovered above the face-down scenarios in a sea of international teams, the late nights of coloring absurd amounts of paper towels red, our screams when we won First Place at Internationals for our Dora skit. I wouldn’t change those moments for the world. Who thought something as educational as solving STEM problems for 2 hours could shape the best parts of my mind and life?

    To make it part of your life, check out the FPSPI website to see if you can find an active division near you. And if there are no current divisions, Future Problem Solving always welcomes the start of new ones! Get out there and solve some problems my fellow STEM kids!

  • How Scientists Tackle Chronic Osteomyelitis using Bioactive Glass

    How Scientists Tackle Chronic Osteomyelitis using Bioactive Glass

    If you asked doctors how to treat chronic osteomyelitis, they would likely all say the same thing: antibiotics, amputation, or bone grafts. However, if you asked the scientists at Galeazzi Orthopedic Institute, you might get told that the best way to treat chronic osteomyelitis is with bioactive glass S53P4, one of the most recent and promising medical advancements for bone treatment. But what makes bioactive glass S53P4 so special? 

    First off, we need to understand what osteomyelitis is, and subsequently what chronic osteomyelitis is. Osteomyelitis is an infection of the bone tissue which can occur due to bone damage, surrounding soft tissue damage, or nearby surgery which allows pathogens to penetrate the protective outer layer of the bone. Once within the bone, pathogens can cause varying degrees of bone loss as the infection progresses. Ultimately, this bone loss can result in limb amputation, sepsis, or even death as a progressed infection can result in organ failure. 

    As mentioned above, the traditional treatments for osteomyelitis consist of antibiotics to kill the responsible pathogen and stop the spread of the infection; however, antibiotics are not always the best option as they can affect other microorganisms in the body. Furthermore, overuse of antibiotics in a clinical setting has allowed for the development of antibiotic resistant pathogens, such as methicillin resistant staphylococcus aureus (MRSA), which will eventually render antibiotics useless. Furthermore, higher degrees of bone loss can result in a very weak bone which cannot be treated with antibiotics alone. So, what are our other options? 

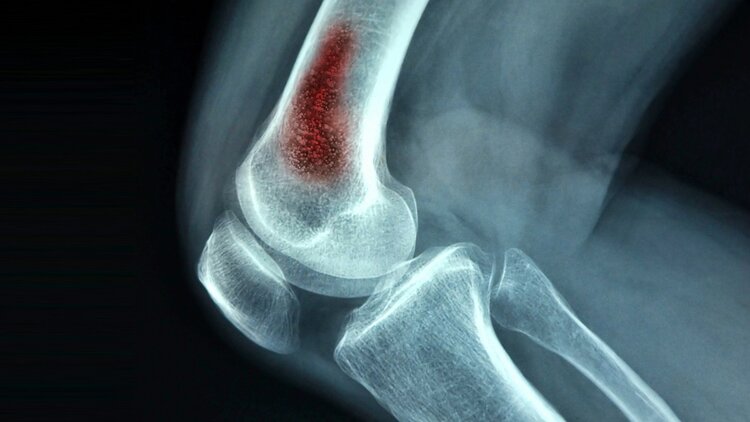
    Figure 1: Xray of a knee with osteomyelitis, as highlighted in red.

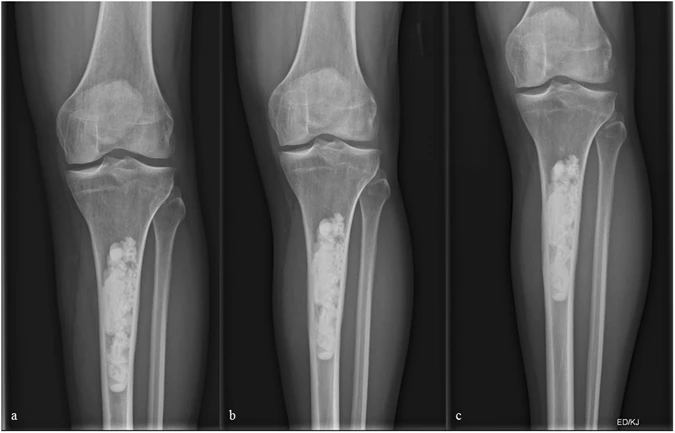
    Clinically, if you want to avoid losing a limb, the next best options would be antibiotic loaded polymethylmethacrylate beads (PMMA) or bone grafting. Both of these methods work through the surgical removal of the necrotic bone tissue and the replacement of that bone tissue with PMMA or fresh bone from a graft.

    Visual depiction of PMMA in bone
    Figure 2: Xray of PMMA that is packed into the tibia of a patient after the removal of necrotic bone from osteomyelitis.


    However, there are some drawbacks as these methods are only designed to fill the bone cavity left behind from the infection, provide limited local antibiotics, and take a long time to produce results. Sadly, bone doesn’t grow overnight! So, what if there was something that could fill the bone cavity, stimulate bone growth, and was naturally antibiotic resistant?

    Enter bioactive glass S53P4 (BAG S53P4). Bioactive glass itself is a silica based biodegradable glass which has been shown to have antibiotic, osteoconductive, and angiogenic properties. Which is essentially a way of saying it stimulates bone growth and blood vessel growth all while repelling those pesky pathogens! BAG S53P4 takes it a step further and is composed of SiO2, Na2O, CaO, and P2O5 which further stimulates bone growth by chemically binding to surrounding bone. This almost sounds too good to be true, so researchers at Galeazzi Orthopedic Institute set out to understand how BAG S53P4 is so effective and determine its safety in a clinical setting. 

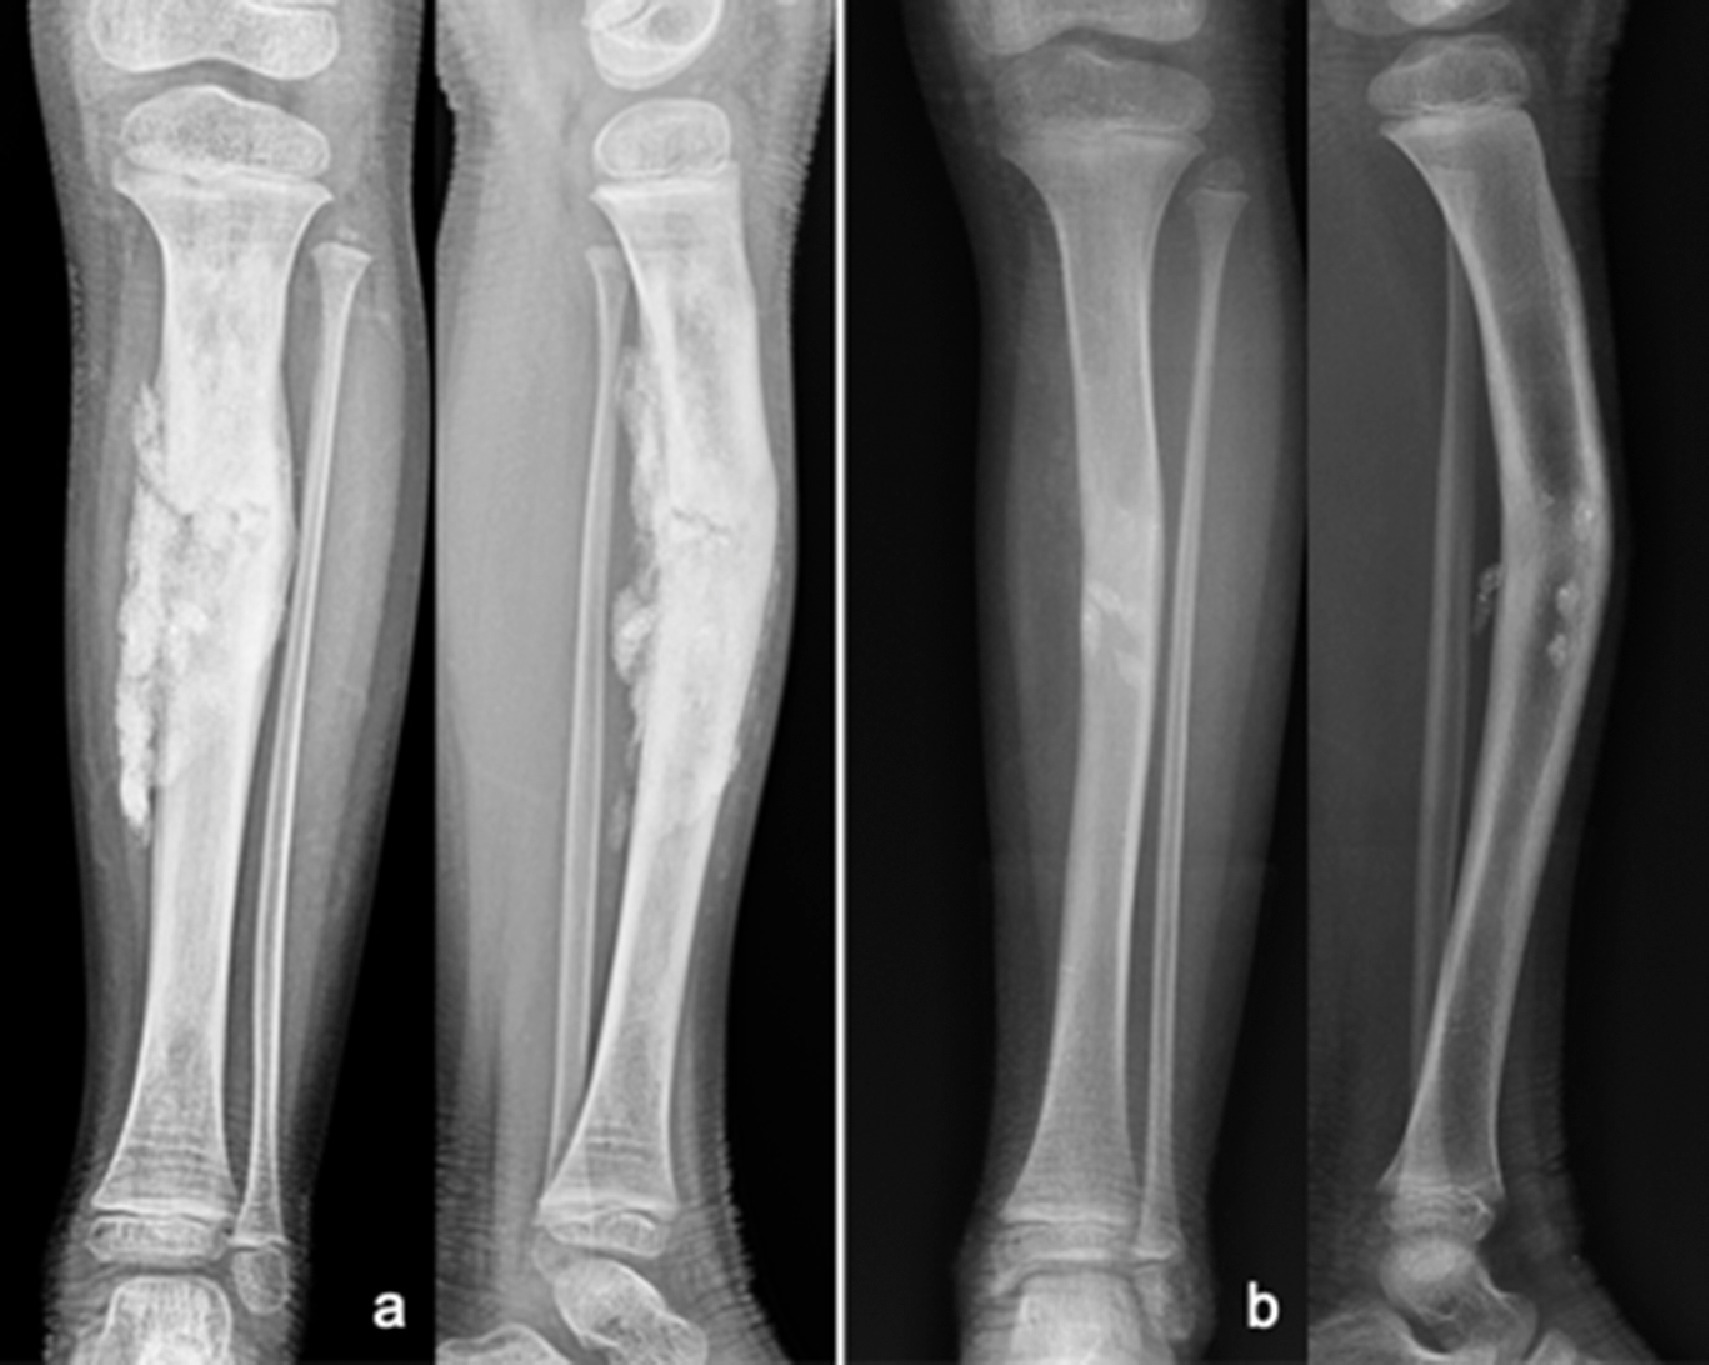
    To determine the source of BAG S53P4s antibiotic properties and to evaluate its safety, the research team took 27 patients with chronic long bone osteomyelitis from antibiotic resistant pathogens and treated them using the bioactive glass.  From their study, they were able to determine that the antibiotic resistant properties of BAG S53P4 stems from its contact with an aqueous solution. By contacting an aqueous solution, BAG S53P4 activates the release of ions which increase the surrounding pH. This increased pH creates a hostile environment for bacterial growth stopping infection in its tracks. As a result, 90% of the treated patients showed no signs of infection after 18 months. X Rays of the patient treated with BAG S53P4 were also taken over the course of 18 months. From these X Rays, the team was able to determine that the vascularization and bone growth seen in these patients far surpassed that of previous methods and was equally safe in its application. 

    Figure 3: Before and after Xray’s of a patient treated with BAG S53P4 over the course of 2 years for chronic osteomyelitis.

    Ultimately, this research determined that BAG S53P4 was a safe and effective treatment for patients suffering from chronic osteomyelitis. So next time you’re asked how to treat chronic osteomyelitis, consider the less traditional route and give BAG S53P4 a try!  

    Source:

    Drago, L., Romanò, D., De Vecchi, E., Vassena, C., Logoluso, N., Mattina, R., & Romanò, C. L. (2013). Bioactive glass BAG-S53P4 for the adjunctive treatment of chronic osteomyelitis of the long bones: An in vitro and prospective clinical study. BMC Infectious Diseases, 13(1), 1-8.

    https://pubmed.ncbi.nlm.nih.gov/24325278/